|
|
CONSTRUCTING A CLINKER PLY (LAPSTRAKE) BOAT |
|
INTRODUCTION Clinker (or lapstrake) construction involves the planking of the hull with adjacent planks slightly overlapping one another (in a stepped fashion). It is a method used in Northern European countries for centuries and produces a hull with graceful, tapering curves to the planking which stand out to emphasize the shape of the boat. It is not an easy method of construction but is very satisfying when completed to a good standard. Although thought of as a method only to be used by experienced and skilled boat builders, we have had several first time builders employ it to create some lovely craft - it comes down to how much practice and learning the builder wants to do before starting. Traditional clinker construction started with a few moulds erected onto a building area, the transom and inner stem plus a hog (inner keel) were added much like the set up for strip planking and then the plank shapes were taken off this basic set-up. There were relatively few moulds used and these were all round (not "cornered" or "chined" for where the plank lands occurred) - in other words, the number and width of the planks was not pre-determined and was decided upon by the builder who may have laid battens or "ribbands" over the moulds, moving them and then nailing them temporarily to the moulds once the correct look had been achieved for the number and sweep/shape of the planks. depending on the method used by the builder, these ribbands were then used to help gain the shape of the first (garboard plank beside the hog/keel) which was then attached to the hog, inner stem and transom. The process was repeated for successive planks allowing the edges to over lap thus :-
Above - planks laid clinker, clencher or lapstrake fashion - the plank "lands" are the points where one plank laps another. Once the hull was planked, the hull was turned upright (if it was built upside down) and timbers were fitted - these were relatively narrow and thin strips of wood, steamed to make them supple and then bent over the inside of the boat across the planking. These timbers were held in place by a copper nail and rove through the timber at each plank land - the copper nail (often square in section) was fitted into a drilled hole with it's head on the outside - whilst one man held a weight against the head to keep it in place, another man cut the nail to the correct length, fitted a rove (a cupped disc) onto the cut end of the nail and then "rivetted" the end of the nail over the rove - this is waht held the planks together. With the advent of modern epoxies, this traditional process could be modified to make the construction simpler and stronger. The wood planking, rather than being solid (often Larch, Mahogany etc) was substituted with good quality marine plywood which is dimensionally stable and easier to get hold of than the required clear lengths of relatively thin solid wood. Also, the seams between the planks, rather than being held together with copper nails against steamed timbers are glued with thickened epoxy producing a lighter weight shell construction which has the appearance of traditional clinker. the modern clinker building process has similarities to the traditional process shown below. |
|
|
| THE MODERN CLINKER PLY METHOD
For this, we will use a couple of different Selway Fisher Designs as examples but mainly the Kane Suffolk Beach Punt.
A. First a building jig is built using chipboard moulds (section shapes) - these are usually given with "corners" or lap points - is "cornered" shapes so that the clinker laps are pre-determined by the design. The transom, inner stem (missing from the above photo at this point) and the hog (inner keelson) are all fitted - the inner stem, hog and transom are all glued/fastened to each other but are only temporarily fastened to the moulds. Ribbands (stringers) are fitted into slots cut at the plank land positions on the moulds but are kept short of the inner stem and probably only fry butted against the forward side of the transom.
B. The garboard and next 2 planks are in place - the ribbands help define the shape of the planks and give something to clamp the plank edges too - screws used to hold the planks together whilst the epoxy cures and which go into the ribbands, are later removed - it important that no glue comes between the inside face of the planks and the ribbands unless, of course, the ribbands are to be permanent stringers within the hull structure.
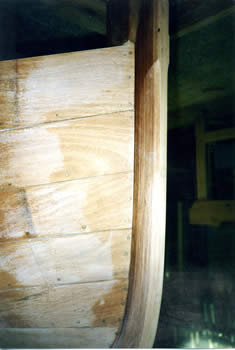
C. Above is a view inside the bow of a clinker Kane Beach Punt showing the inner stem attached to the hog.
D. A similar bow on the outside - note 2 items here - first, the outer stem which has been laminated directly over the exposed edges of the plywood planks and second, the fact that the planks are all "flush" with one another at the stem - a similar view of the planking at the aft end would also show the planks "flush" with each other as they go over the transom. If this was not done, the planks would stick out over each other with gaps needing filling with the inner stem and the wjole affair would look very ugly - to avoid this and end up with a nice flush appearance each plank has a "let" or "gain" cut into it. This is a tapering rebate which goes from nothing in depth a few feet back from the stem to full plank thickness depth right at the end of the plank. The width of this "gain" is the width of the overlap between two adjacent planks - therefore one plank gradually sits in this rebate ending flush with it at the extreme end.
E. Above is the hull of a clinker Islay Skiff (Pandora by Rob Johnsey) with the jig removed from it - the inner stem was laminated over a former attached to the first mould.
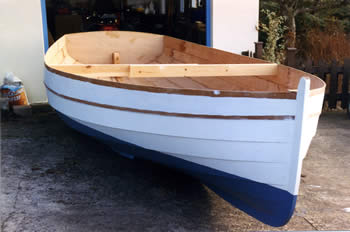
F. The clinker shell of a Kane Suffolk Beach Punt by Ian Gardner recently removed from it's jig.
G. Another Kane being fitted out with lockers, seats and water ballast tanks - note that in this example, the ribbands/stringers have been left in as part of the structure - this is often done when thinner plywood is used for the planking.
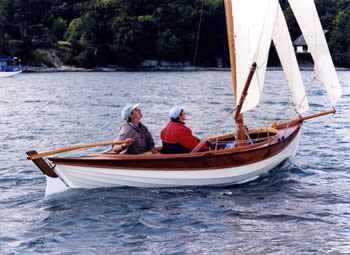
H. Above - 2 examples of finished boats - left is Ina Gardner's Kane Suffolk Beach Punt and right is Ron Johnsey's Islay Skiff. |